Installing PalmOrder On Your Mobile Device
Our system can be installed on any mobile device on one condition: a device must run Android OS version 2.2 and higher. The higher, the better. (Our device runs v. 4.4.2. If you have another version, actions may slightly differ). So to install the application, follow these steps:

Find the Play Market shortcut and tap it

Tap the Search window and type palmorder

Tap the magnifier icon to start searching
If you are lucky)), you will see something like this:

Tap a rectangle with the words «PalmOrder — Pre-selling&Merchandising».
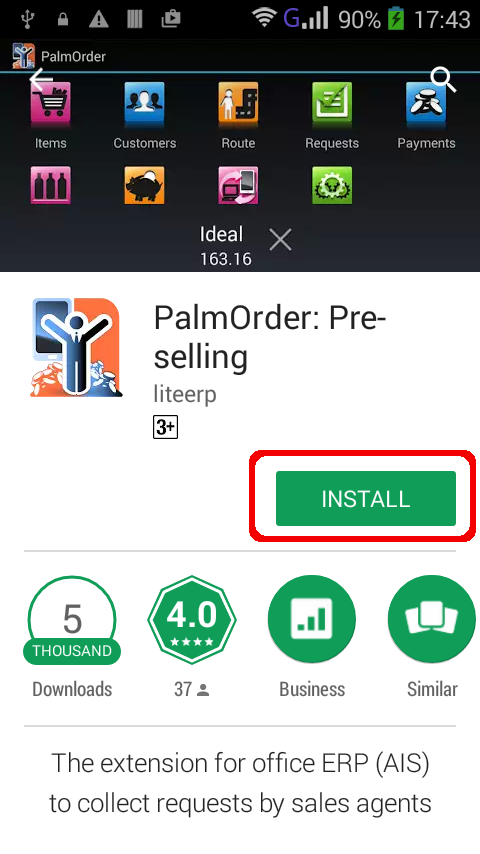
Now all you have to do is tap the «Install» button. Usually it is located in the most inconspicuous places, so we'll give you a hint just in case: it's somewhere around ← here:
Then you're asked something about the history, your location and photos, but all these do not really matter: agree with everything and accept all terms. As a reward, in less than a minute you will not just have installed the system, but also created a shortcut on your Desktop. Then tap the «Open» button or postpone this until you have the inspiration.
By the way, do you have an Internet connection set up on your device?:)
Start
If you are here again, then you are really inspired!) To open PalmOrder, find its shortcut and tap it. It may seem like it's taking forever to launch the application, but it only seems so this is only true the first time. Next launches will be much shorter. We just need to prepare the application for work, which may take 15-20 seconds.
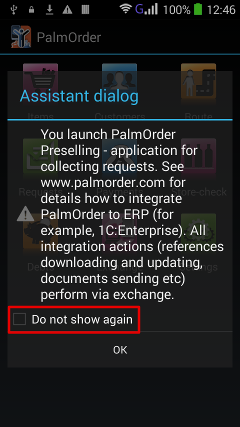
You will see a main window of the program with a number of colored squares called icons. These are your assistants. They will help you to cope with all the problems you may shortly face. But the icons and the half of the screen seem to be blocked by a black square.
Oddly enough, it is also an assistant. A dialog assistant, actually. Do you understand everything that is written there? Then tick off the box near the sentence «Do not show again», and tap «OK». It will not disturb you anymore. Were you late or didn't tick off the box before tapping «OK»? Don't worry, you can do it next time you start the program.
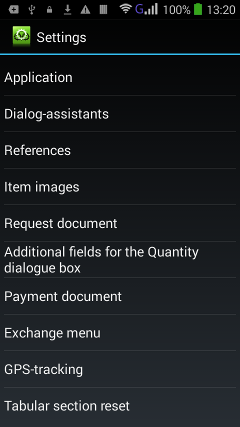
Settings
The «Settings» section is the most important part of the program. Probably that's why the icon is located at the very end. Tap it and let's get this party started!
The first item on our list is «Application» which contains only two options: «Theme» and «Debug mode». The window where these options are located is called «a form». Basically, everything we see on the screen is a form: a document, a journal, a reference. And the form options are called control elements. We use three types of form control elements: a drop-down list, a check box, and a button. And all of them are present here!

A drop-down list is designed to show a list of values, each appearing in a separate line. A list can't have many columns, it is always just one — a list itself. Only a selected list element is displayed in the inactive state. To select another item, tap the one currently selected, and choose a desired item in a drop-down list that appears. After it the list reduces, and a newly selected item is displayed. Try to select the Holo Light theme. If you don't like it, go back to Holo Dark. Upon confirmation of the theme change (Holo Light to Holo Dark and vice versa), the program will return you to the main window, because in this case an internal reinitialization takes place. To return to the settings window, just tap the «Settings» icon again.
The second form control element – a check box – is designed to enable or disable a corresponding value. Thus a check box has two states: selected and cleared, which you can change by tapping. The application will run in a debug mode if the check box is ticked off, and in a normal mode if it's cleared.
The third form control element is buttons. Yes, the ones that we know from our childhood, «Exit game?» — «Yes»/«Noooooooooooooooo». Except in PalmOrder we have «OK» and «Cancel». Clicking «OK» will confirm the changes you make, and a current selection will be accepted by the program. «Cancel» disables your choices, and everything returns to the way it was. Try it out.

Finally, the eighth item on our menu is «Exchange Menu». It has two points: «Local» and «Remote». It means that we can configure two types of exchange. And no, we need two types (addresses) not for transferring data to our server and the competitor's one, but to be able to use an internal wireless network in the office, e.g. Wi-Fi or Bluetooth instead of «the… uh… Internets». After all you must know that your server's IP in the Internet differs from the Wi-Fi's IP.
Now choose «Local». As you have probably guessed, it is also a form, and it's designed as a dialog box with just one type of form control elements – buttons «OK» and «Cancel». But there are some weird names and numbers as well. These are the input fields, where letters and numbers are entered to be stored and, at the right moment, used in our work. We will focus only on one of them called «Address». We need to fill it in for the program to know where to upload gathered information. Type address in the appropriate field using the virtual Android keyboard (almost the same way as you did on Play Market when looked for PalmOrder). How do you get to know your address? The easiest way is to ask your network administrator IT-specialist IT guy. He'll tell you numbers like 192.168.0.136 (this is your server's IP-address in local wireless network) that should be entered exactly this way — separated with dots. Other fields leave as they are. Tap «Back» button to remove the virtual keyboard. Then «OK».
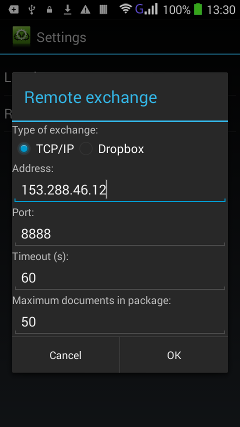
Now tap «Back» and choose «Remote». Make the same actions for remote exchange that uses TCP/IP protocol.
But when you ask for IP-address to enter, don't be suspicious if instead of address numbers you are told to enter something like salespalm.no-ip.biz. This is not a joke. It means that your server doesn't have a static IP-address, so you have to use a special service to assign a domain name to your server. When somebody wants to send some data to your server, they ask, «Where is the computer named «your domain name»?» and receive the answer, «Its current IP-address is «your current address»». And all incoming information is redirected to your current IP-address no matter how often it changes. This domain name must be stored in the «Address» field of remote exchange. Note, that you can also use exchange via Dropbox. Refer to Administrator's Guide and FAQ.
If you don't have any IT guy around, open your browser, enter «my ip» in the search window. Your search system will offer you dozens of services to define your IP-address. Choose any to your liking. Usually when you open such sites, in one of the corners on your screen you will see something like «Your IP is 153.288.46.12». Enter these digits separated with dots in the window «Address» of Remote Exchange.
Don't forget to tap «OK» to complete your action.
It is much easier more difficult to find out your local IP-address. You need to open the Command Line window (if you use Windows XP, just click «Start» — «Run…», type cmd and press «Enter»), in the window that appears type ipconfig and press «Enter». One of the addresses corresponds to your local IP-address. Usually it starts with 192.168.... Enter it in the window «Address» of Local Exchange.
Please note, that if you use Wi-Fi router to access the Internet, you need to configure port forwarding for a proper work of PalmOrder's exchange.
Exchange
We assume that the server part is already installed and configured. If not, wait until this is done. Or do it yourself as described
You can get to «Exchange» through the main window of the program, which we sometimes call the Desktop (the difference between them is that the Desktop is capitalized, and the main window is not). You can return to the main window from the «Settings» window one way only: by tapping the «Back» button of standard Android menu. Usually it is located in the lower left corner.
On your device it may be either at the bottom or at the top of the screen. Or it may not be on the screen at all but near it (like mine). It depends on the preferences of the manufacturer — Uncle Liao.

Tap the «Exchange» icon. If you get the message like in the first picture, then you need to install a license. If the message doesn't appear, the license has been already installed. You can check it by yourself: return to «Settings» («Back», tap «Settings»), choose the last menu item «About…» (scroll the screen down if you don't see it).

As you can see, our device has the license already installed: the license name is in the «User» field. Tap «OK» (in this case, when no data is entered, it is possible to tap «Back» instead of «OK»), «Back» again and then «Exchange». In the «Types of exchange» drop-down list you have only one option — «Download the file of exchange». 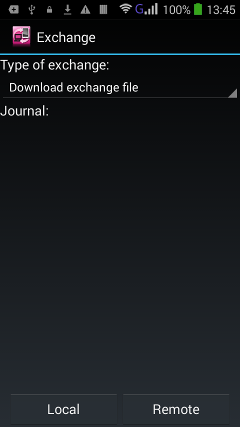 You need the file of exchange because it contains the algorithms for all exchange types. Without it you won't be able to transfer any information to a server, or retrieve data from a server. You need the file of exchange because it contains the algorithms for all exchange types. Without it you won't be able to transfer any information to a server, or retrieve data from a server.
Some conscientious users can see one more item on their drop-down list — «Send DB and LogCat». This is because they ticked off the «Debug mode» box when they were reading the previous chapter about the form control elements. They naively believe that it will help the program to run more reliably. Disappointing, but it will not!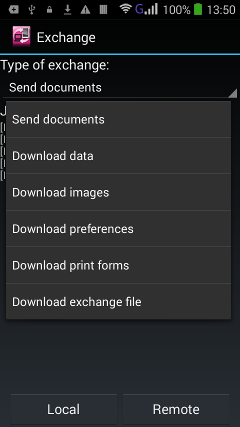 It's just if the application encounters some kind of error, and you contact us for help, we will ask you for more information. You can do that only by selecting the type of exchange «Send DB and LogCat». And to ensure that it appears on the list of «Types of exchange», you need to activate the debug mode. It's just if the application encounters some kind of error, and you contact us for help, we will ask you for more information. You can do that only by selecting the type of exchange «Send DB and LogCat». And to ensure that it appears on the list of «Types of exchange», you need to activate the debug mode.
To perform exchange, tap the necessary button — «Local» or «Remote».
After the file of exchange is downloaded, your device is ready for a full operation. As you see in the picture, and now on your device as well, you are able to not just download another file of exchange (yes, it can be changed). Now you can send documents and photos, send DB and LogCat, download data carefully prepared by your colleagues from a sales department, including images (meaning that you can download pictures of goods to brag about to show them to customers), and do some more actions.
References and Lists
Return to the main window (tap «Back» once or twice depending on the situation). There are seven more icons besides «Settings» and «Exchange». Five of them cover the documents («Route», «Request», «Payment», «Store-Check» and «Debt»), and only two relate to the references. These two we're going to review now: «Items» and «Customers».
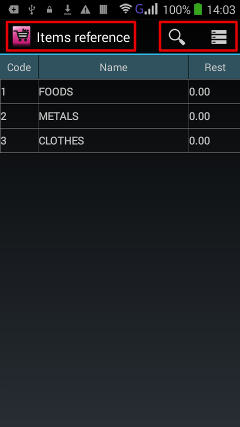
Let's start with… any, actually. Tap a corresponding icon (we tapped «Items», but everything we'll talk about is equally true for «Customers»; the differences we'll review separately), and a reference is open. In the top left corner there is the name of a reference (you can refresh your memory in case you suddenly forget where you are). In the top right corner there are form control elements — buttons: «Search», «Hierarchy» (enable / disable a hierarchical representation of the reference entries). Lower is a reference itself.
As you see, it is hierarchical, i.e. all its elements are placed in folders. The number of levels is not limited. Tap the «Hierarchy» button to enable/disable this mode. A reference with disabled hierarchy looks like this.

If there are too many entries, it's wise to use the search. Tap the «Search» button, then tap the search box to call the virtual keyboard. Start typing the name you need. Only entries that match the search criteria will remain on the screen. 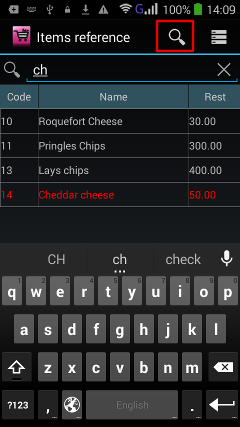 The search is performed in an opened folder. If you want to search an entire reference, disable the hierarchy. The search is case-insensitive, i.e. if you enter a lowercase «m», words starting with both uppercase and lowercase «m» will remain on the screen. Keep in mind that the search can be conducted only in the «Name» column. Tap the «Search» button again to finish searching. The search is performed in an opened folder. If you want to search an entire reference, disable the hierarchy. The search is case-insensitive, i.e. if you enter a lowercase «m», words starting with both uppercase and lowercase «m» will remain on the screen. Keep in mind that the search can be conducted only in the «Name» column. Tap the «Search» button again to finish searching.
Besides the search you can use a filter. It is case-insensitive too, but unlike the search it:
- looks for a substring in a string;
- filters the values of not just the «Name» column, but any column you specify.

Let me explain the first point. For example, you enter «ch» in a filter window, in the «Name» column. Then you will get not only words that begin with «ch» – «Roquefort cheese», «Pringle Chips», «Lays chips» and «Cheddar cheese». But also «Heinz Tomato Ketchup» and «Poncho».
Point 2 should not be hard to understand, we hope.

To call a filter, tap «Menu» and in the drop-down list select «Filter». There will be a dialog box with only two options:
- a column to filter (select a necessary field from a drop-down list);
- filter value (use the virtual keyboard to enter the value of a filter).
Tap «OK»
Pay attention to the line with the value of a filter at the bottom of the screen. It can be used to reset a filter: just tap the cross on the right.
You may have noticed that, in fact, there are more fields in the drop-down list than on your screen at the moment. The thing is that some columns are hidden, but you can make them visible using journal settings. There are two ways to invoke the settings window:
- tap «Menu», choose «Settings» (like in the left picture below), or
- long-tap the name of a column (the result is in the right picture below).
 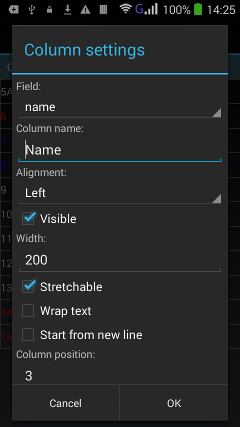
There is only one difference: in the first case the current (selected) element in the «Field» option is the first column of a table, and in the second case it is the long-tapped one. However, if you need to select another column, just choose it from a drop-down list.
Moreover, you can:
- change the name of a column: simply enter a new name in the «Column name» field;
- align a field text: left, right, center — whichever you prefer;
- make a column appear on the screen by ticking off the «Visible» check box;
- change the width of a column by setting a new value in pixels;
- expand a column by ticking off the «Stretchable» check box so that a table fills the whole screen;
- display a column text in two lines if it doesn't fit one (just tick off the «Wrap text» check box). If the check box is cleared, text will be clipped;
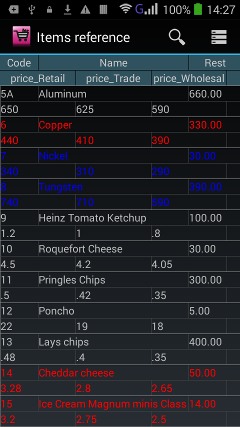
- move a table, if it's too big, to see the parts that don't fit the screen. However, if you need all values to be present on the screen simultaneously, you can display each record in two lines. Just tick off the check box «Start from new line» for the fields that should be displayed on the second line. It will look like in the screen shot to the right. In this case the check box «Start from new line» was ticked off for the fields «price_Retail», «price_Trade» and «price_Wholesale»;
- set a new column number (can you guess what it is?);
- set the type of displaying data on the screen. Can you set a Real type for the «Column name» column? — Yes, you can. Do you need it? — Decide for yourself. Besides that, if «Real» format is selected, you can set the desired number of decimals.
You can perform these steps with any table column. Just choose the necessary one in a drop-down list of the «Field» box. Tap «OK» when you're done with settings, otherwise you will have to repeat it again.

In addition, you can use a context menu. Just long-tap an object you want to modify. A long tap on a column name, as you already know, invokes a column settings dialog box. A long tap on the «Items» reference line invokes «Details» or the image of a product (if it has been loaded in advance; how to make and load pictures read here). Just like in this screenshot. Oh, cheese «Sovietic»! In a fancy package, probably. A short tap doesn't have any effect.

These actions slightly differ for the «Customers» reference.
A short tap moves a customer to the Desktop (it appears at the bottom of the screen), and the program takes you back to the main window. This feature is very convenient, because you won't need to fill in all the Details' fields when creating a document. They will fill automatically. However, it can potentially lead to errors. For example, you pay a visit to «Standard LLC», but there is the «EnergySynth» customer on your Desktop. If you forget about it, the items meant for «Standard LLC» may well be delivered to «EnergySynth». That's why, to avoid such mistakes, it is better to work from the context menu (you can call it with a long tap on the customer). Except the customer's «Details», you can choose to create any document for a particular customer.
Nota bene: the document Details will also be filled automatically, which can save your time considerably. It's important to know, that if you create a document using the context menu, at the end you will be taken back to the «Customers» reference. To find a created document, you will have to open a corresponding journal.

If you are in the «Customers» reference, go back to «Items» and, if a hierarchy is disabled, turn it on. We've already mentioned earlier, that data in a reference are stored hierarchically. To enter a folder, just tap its name, which will become gray. To move a level up, tap the highlighted gray line. Pressing «Back» will take you from a reference to the main window.  But in a hierarchical directory the action of this button can be configured to perform differently. Tap the «Settings» icon from the main window, select «References», and tick off the check box «Go up through the hierarchy when press «Back»». Now, being in a nested folder, you will move one level up when the «Back» button is pressed. You are free to choose the option which is more convenient for you. If you prefer to work with a hierarchy disabled, then you will find the option «Show parent groups in Details» very useful. In this case, if a hierarchy is turned off, in «Details» you will see groups (folders) the item belongs to. But in a hierarchical directory the action of this button can be configured to perform differently. Tap the «Settings» icon from the main window, select «References», and tick off the check box «Go up through the hierarchy when press «Back»». Now, being in a nested folder, you will move one level up when the «Back» button is pressed. You are free to choose the option which is more convenient for you. If you prefer to work with a hierarchy disabled, then you will find the option «Show parent groups in Details» very useful. In this case, if a hierarchy is turned off, in «Details» you will see groups (folders) the item belongs to.

And the last thing. There is a frequently asked question, «How can I add a new record to the «Items» («Customers») reference?» The answer is, you can't. PalmOrder is not an independent accounting system, but only an extension of your office ERP. So it can only operate the data downloaded from there. To receive information from your office ERP, tap the «Exchange» icon in the main window, then choose the type of exchange «Download data», and tap a corresponding button («Local» or «Remote»). Before you do this, make sure an IT-specialist has the data prepared for you.
Moreover, the program uses the following reference lists:
- type of payment;
- type of delivery;
- category of price;
- points of sale.
Where and how they are applied you will soon find out.

Journals
The program has four journals: «Orders», «Payments», «Store-Checks» «Debts» («Routes» is also a journal but with a special status, so we'll talk about it later). You can access any of them by tapping a corresponding icon in the main window. Inside you will see the documents that have been created and transferred to a server (highlighted in red), or are waiting to be sent (highlighted in white if you use Holo Dark). All documents of the «Debts» journal are always white because their transfer to a server is not supported. If, for some reason, there appears a document highlighted in red, it means that you should turn your attention to it.
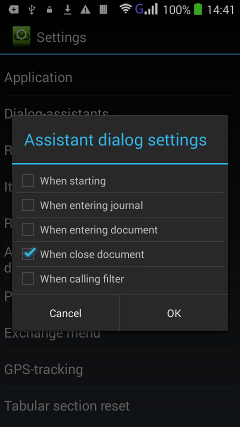
When you open a journal, you see the black square on the screen again. It's probably high time to tell you that the dialog assistants will appear on the screen not only when you start the program, but also if you:
- open a journal;
- open a document;
- close a document;
- call a filter.
When you learn everything that is written there by heart, you can tick off the check box «Do not show again» and tap the «OK» button. But if you suddenly forget what you're supposed to do, don't worry. To call the assistants from oblivion, just tap the «Settings» icon on the Desktop (i.e. in the main window), choose «Dialog-assistants» (the second in the list), tick off the necessary check boxes, and tap «OK».
Let's get back to journals. They are designed to store created or received documents. For example, if we created a «Request» document while being in the «Customers» reference (as we suggested in the previous chapter), it would not be logical to store the document in the same reference. But we do need to put it somewhere. Specifically for this purpose we designed the journal of documents. To open any document, enter a corresponding journal, find the document you need, and tap it. Always make sure that a journal filter is disabled. When a filter is on, you will only see the documents that satisfy the search criteria. Keep in mind, that when you create a document by means of long-tapping a customer in the «Route» document, this customer is moved to the Desktop the same way when you short-tap a customer in the «Customers» reference and in the «Route» document. In this case a corresponding filter becomes active in all journals. So to view all documents in a journal, don't forget to turn off the filter (you know how it's done: tap the cross in the right corner at the bottom of the screen). Keep in mind, that when you create a document by means of long-tapping a customer in the «Route» document, this customer is moved to the Desktop the same way when you short-tap a customer in the «Customers» reference and in the «Route» document. In this case a corresponding filter becomes active in all journals. So to view all documents in a journal, don't forget to turn off the filter (you know how it's done: tap the cross in the right corner at the bottom of the screen).
Long-tapping a document invokes its context menu, which contains all the actions that can be done with a document. Use it to save your time.
Now let's consider closer the item «Change transfer status». Sometimes you need to re-send a document to a server. But if it was already transferred earlier, the status of the document is «Sent» (it's highlighted in red), and you can't transfer sent documents again. All you need to do in this case is to change the transfer status, and you can send it again.
The top line of the journal contains its name (on the left) and one button (on the right hand) «+» (probably no need to explain what it does) You can also call «Menu» by pressing/tapping standard Android menu-button. We have three courses on the menu: «Report», «Filter» and dessert «Delete sent documents». «Report» will give you some basic information on the documents, e.g. the number of documents, total amount, total amount minus discount. Not much, but still something. We have described how «Filter» works in the «References» chapter. If you need to filter documents by customer, as an option you can move a corresponding customer to the Desktop instead of applying a filter. And the item «Delete sent documents» speaks for itself. It should be noted, however, that documents are not automatically deleted, so you can keep them for history. By the way, the «Debts» journal doesn't have such menu item (could be added just for fun, though). Also there is no «Settings» item in a journal menu, but it doesn't mean that you can't configure anything. Long-tap a column header, and be our guest to configure whatever you want. Why wasn't this option included in the menu? You'll hardly believe it – we simply forgot!
The «Route» Journal

The «Route» journal is special, because it absorbs features of a reference, journal and document. On the one hand, customers are its elements, thus it looks like a similar reference. The context menu is the same, and you can move a customer to the Desktop as well. On the other hand, this page is a plan of visits for a certain date, though you can't analyze a route for a specific time period. So from this point of view, it is a journal of documents where you can't see all the documents on the screen simultaneously. If you select a different date (tap the date and choose another day in the calendar that appears, then tap «Done»), you get a different list, although in both lists customers can be repeated the same way as items are repeated in different documents. By long-tapping a customer in the «Route», you can create any document: «Request», «Payment», or «Store-Check», and a customer will be moved to the Desktop (short tap will just move a customer to the Desktop, as was mentioned earlier, but will not make it possible to create a document). The customer, for whom a document was created, will be highlighted in red. It also means that a customer's point of sale was visited. All customers on the screen, highlighted in white, are your plan of visits. How can you reproduce the signal of visit, if a customer did not request any goods? Create an empty «Request» document. A route from your device (let's call it scheduled) can be compared with an actual route using GPS-tracking (GPS-online) from our server gps.palmorder.com. You can't create, change, or delete a route on your device. It is created on a server and transferred to a device in the «Download Data» exchange mode. you get a different list, although in both lists customers can be repeated the same way as items are repeated in different documents. By long-tapping a customer in the «Route», you can create any document: «Request», «Payment», or «Store-Check», and a customer will be moved to the Desktop (short tap will just move a customer to the Desktop, as was mentioned earlier, but will not make it possible to create a document). The customer, for whom a document was created, will be highlighted in red. It also means that a customer's point of sale was visited. All customers on the screen, highlighted in white, are your plan of visits. How can you reproduce the signal of visit, if a customer did not request any goods? Create an empty «Request» document. A route from your device (let's call it scheduled) can be compared with an actual route using GPS-tracking (GPS-online) from our server gps.palmorder.com. You can't create, change, or delete a route on your device. It is created on a server and transferred to a device in the «Download Data» exchange mode.
GPS-Tracking (the shortest chapter in the history of manuals)
PalmOrder supports GPS-tracking. How to set up this feature.
Documents
At last let's review the most important things: how to create documents and send them to a server. Why did we leave the most significant questions for the end? Well, if we explained this in the beginning, would anyone read the manual up to the end?
You can create a document in three ways:
- while you are in the «Customers» reference: call the context menu (use a long tap) and choose a corresponding menu item;

- while you are in the journal of documents: call the context menu and choose «New» or «Copy» or
- tap «+» on the form control buttons panel (in the top right corner).
In the documents «Request», «Debts» and «Store-Check» there are two tabs — «Details» and «Items». Just tap the tab name to open it. The «Details» tab differs depending on a document. For example, the «Debts» document has six essential elements in «Details», but none of them can be changed. The «Store-Check» document has only two drop-down lists: «Customer» and «Point of sale», plus the notes window. And in the «Request» document, besides others, there are four more points: «Category of price», «Payment type», «Delivery type» and «Date of delivery». These are precisely the lists we mentioned in the chapter «References and Lists». Now let's review them in details.
The «Details» Tab
When you tap the «Customer» field, the program redirects you to the «Customers» reference to choose the one you need. This field is filled automatically if you choose a customer from the Desktop, or if you create a document using the context menu in the «Customers» reference or in the «Route» document.
The «Point of sale» field is also filled automatically, but only with the first available value for this customer. So if a customer has a couple of shops, you need to set the correct one by selecting it from a drop-down list.
The «Category of price» contains the value of a corresponding field from the «Customers» reference. However, you can change it. In this case, if you already have some items in the table, the program will ask if you want to recalculate the prices for the selected goods. If you answer «Yes», it will recalculate; if «No», a new category of price will be applied only to the newly added items. And what happens if you answer «No» and then change the number of already selected items? We don't know, but you are welcome to check it yourself.
Sometimes you can't change the category of price, as there's only one value in a drop-down list. This happens when the option «Fixed setting of category of price for customers» is activated for the «Request» document in the program settings. You can check it by tapping «Settings» icon in the main window, choosing «Request Document», and entering password (admin by default).

Here's what you should see:
Let's get back to the «Details» tab.
For the «Payment type» and «Delivery type» fields choose a desired value from the drop-down lists. In the «Date of delivery» field enter the date when the goods are to be shipped.
The «Items» Tab

To enter the table of items, tap the tab name. To add items, tap a corresponding button. On the screen you'll see an items selection table for the «Request» document, where you can set a desired number of units for each item in several ways.
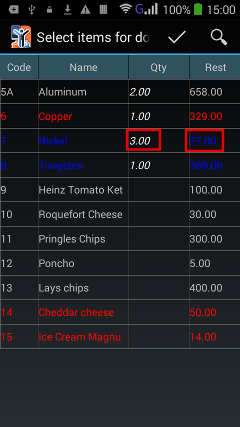 The easiest one is to tap a desired cell of the «Qty» column to increase the number (increment step is 1). To decrease the number, tap the cell of the «Rest» column. Please note, that if you increase the quantity of request, the «Rest» of the stock is automatically reduced. Don't you see it? Are you sure? Strange, our «Rest» is reduced… The easiest one is to tap a desired cell of the «Qty» column to increase the number (increment step is 1). To decrease the number, tap the cell of the «Rest» column. Please note, that if you increase the quantity of request, the «Rest» of the stock is automatically reduced. Don't you see it? Are you sure? Strange, our «Rest» is reduced…
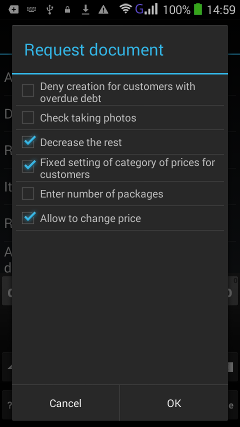 Oh, we know what's wrong! Leave this page without saving. Tap the «Settings» icon in the main window, choose «Request document», enter password (admin by default). Is the check box next to «Decrease the rest» enabled? If not, do it. Then tap «OK» → press «Back» → tap the «Requests» icon → tap the «+» button → select a customer → tap the «Add items» button. And now? Does the «Rest» decrease? There you are!
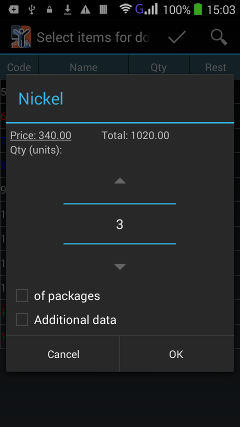
Another way to enter the number of items is to call an amount dialogue box. Tap any cell except the «Qty» and «Rest» cells, and you'll see the Quantity dialogue box. To increase the number, tap the Up arrow, to decrease — the Down arrow. If you need to enter a very large number, tap the digit to call a virtual numeric keypad. Enter the necessary number and tap «Done», then «OK». Please do not enter numbers greater than 1,000,000,000,000.

From the Quantity dialogue box you can also change a price, if you enable the check box «Allow to change price» for the «Request document» in «Settings» (as in the top left picture). To do this, tap a current price in the upper left corner of the Quantity dialogue box, enter a new price in the window that appears, tap «OK».

When the «Of packages» check box is enabled, you will enter the number of packages. When calculating the total amount for this line, the quantity will be multiplied by a corresponding rate (the value of a relative «Package» field in the «Items» reference), and then multiplied by a price. A corresponding line in the «Items» tab will contain a number (of packages) and a multiplier or rate (a quantity in a package). If the «Of packages» check box in the Quantity dialogue box is enabled, it means that the option «Enter number of packages» for the «Request Document» is enabled in «Settings».

In the Quantity dialogue box you can also have an additional item information. To display it, enter the program settings  (the «Settings» icon in the main window), choose «Additional fields for the Quantity dialogue box», tick off the boxes next to the fields that you want to see, tap «OK». Enable the «Additional data» check box to see these values, and they will appear immediately. (the «Settings» icon in the main window), choose «Additional fields for the Quantity dialogue box», tick off the boxes next to the fields that you want to see, tap «OK». Enable the «Additional data» check box to see these values, and they will appear immediately.
It should be mentioned that you can also use the search, enabled or disabled hierarchy, and filter in an items selection table. Moreover, you can adjust columns the same way as in a reference or journal: long-tap a column header or choose «Menu» → «Settings»
To exit an items selection table, tap the «√» button on the form control buttons panel, or press «Back».
Menu
Discount
Discount can be set both as an amount or percentage. To set a discount, tap «Menu» and choose «Discount», then «Amount» or «Percents». To set the sum of a discount, just enter a desired amount, and the program will divide it in proportion to the line results. To set the percent of a discount, enter the percentage in any way you know, e.g. through the «Enter discount percent» dialogue box. To avoid misunderstandings, set reasonable discounts according to your functional powers. And don't enter the value greater than 100%.
Is it possible to set a discount for a separate item? Sure! When you are in the «Items» tab, long-tap on the line you want to set the discount and choose «Value of discount» or «Percent of discount».
Photo
If you choose «Menu» → «Photo» in any document, you have the opportunity to make images, save and send them to a server. After you confirm that a photo is saved, the program will return you to the same page you were on before.
Report
The «Request» report is not much different than a journal report, except the time period is not set. That is why no need to consider it in details.
You can save and exit a document in two ways: by pressing the «Back» button of a standard Android menu, or by tapping the «Save» button (looks like a floppy disk) on the form control buttons panel.
Let's repeat the procedure one more time: tap the «Settings» icon in the main window, and choose the «Request document» (admin is a default password). We have two points left to consider:
- «Deny creation for customers with overdue debt». You have certainly taken notice of the column «Overdue debt» when studying the contents of the «Customers» reference. The information about overdue debts is transferred from an office accounting system. If the check box is ticked off, you can't take requests from this customer. Please don't try to work around this limitation set by your administrator, it's not worth it.
- «Check taking photos». In some cases your supervisor may require you to take a photo in a point of sale. If the check box is ticked off, you won't be able to create a request until an image is saved. So if you see the message «Creating Request is banned. Take a photo», tap «Menu», choose «Photo», take and save an image, and continue your work.
Since we have reviewed in great details the «Request» document, there's no special need to do the same with the «Store-Check». Just do everything by analogy. But first find out what this document is for.
The «Payment» Document

If you are given the authority to receive money from customers, this document is for you.
All you need is to choose a customer and a basis document, and enter the amount of money. Both «Request» and «Debt» documents can be chosen as basis.
If you choose a basis document first, the fields «Customer» and «Total» are filled automatically. If you choose a customer first, the records from the corresponding journals («Requests» or «Debts») will be filtered according to this customer. The total amount will be copied automatically from a basis document. If you receive a different amount, don't forget to correct it before saving the document.

A supervisor can additionally forbid to delete or edit the «Payment» documents. To do this, tap the «Settings» icon in the main window, choose «Payment Document», and tick off the check boxes «Forbid to delete unsent documents» and/or «Forbid to edit saved documents».
The «Debt» Document
This document is generated by your office ERP and transferred to a device as an additional information. It helps you to receive a correct amount of money from customers. You can't change anything in this document, but you can use it as a basis for creating the «Payment» document (as was described in a previous chapter, or directly from the «Debts» journal by calling the context menu and choosing «Document-based input»).
For Dessert

We don't often treat our users with the releases of new versions, but it still happens several times a year. Sometimes after update the table column headers become quite unattractive. In this case you should take some time and clear the table settings. Tap «Settings» in the main window, choose «Tabular section reset», tick off the necessary check boxes, tap «OK». And then gradually continue to adjust the view, until your tables look just perfect.
|